Install the app
How to install the app on iOS
Follow along with the video below to see how to install our site as a web app on your home screen.
Nota: This feature may not be available in some browsers.
Je gebruikt een verouderde webbrowser. Het kan mogelijk deze of andere websites niet correct weergeven.
Het is raadzaam om je webbrowser te upgraden of een alternatieve webbrowser te gebruiken.
Het is raadzaam om je webbrowser te upgraden of een alternatieve webbrowser te gebruiken.
E2K bouwdraadje
- Topicstarter HugoW
- Startdatum
Hoi Gijsbert,
volgens de handleiding van de Jasper (zelfde vleugel) 46 tot 60 mm vanaf de voorlijst gemeten. Of dat de beste is... Ik las ooit dit:
Ik ga ook zo aan de slag.
Hugo
volgens de handleiding van de Jasper (zelfde vleugel) 46 tot 60 mm vanaf de voorlijst gemeten. Of dat de beste is... Ik las ooit dit:
NMPRA-website-AJ-Seaholm zei:Model set-up is a huge part of flying consistently. The faster events in RC Pylon don't provide a whole lot of time to be wrestling your model around the course. So, spend the time to get your bird flying as well as possible. The three trimming basics are described below:
Center of Gravity (CG) – Use CG to trim the straights. If a model coming out of pylon 3 headed towards pylon 1 and feels like it's drifting in towards the pylon, it's nose heavy, slide the CG back. A tail heavy model will not want to drop the nose on landing and seems very jumpy on the course.
Rudder Trim – Use the rudder to trim your model's yaw in the straights. If the tail is hanging low or high, trim this out with a couple clicks of rudder. Flying with the tail up or down essentially exposes the side of the fuselage to the air and acts like a parachute.
Tip Weight – If your model feels like it dives or balloons up through the turns use lead tape or coins to add weight to a wing tip. If the tail kicks up, the model needs tip weight on the top wing. Vice a versa, if the tail wants to kick down through the turn, add some low tip weight. Don't try to figure out why this works, just accept that it does. At least that's what I had to finally do.
These three trimming basics will help dial that model in and make your job as the pilot much easier. The less you have to fly the model and provide inputs to those little drag makers we call control surfaces, the faster you're going to go.
Now that you've nailed your model's set-up it's time to get some laps in. Flying the course is not that hard, flying the course consistently tight and smooth for 10 laps in a row is very challenging. This should be your goal every time out. Smooth is fast. I've adopted the less is more technique when it comes to control throw set-up. This is a widely accepted method for setting up a model in pylon racing for good reason. For one, again smooth is fast, minimizing control movement will scrub less speed and reduce heat times. The second component to the less is more approach to control set-up is the adrenaline factor. It is very probable you can fly rock solid smooth laps with a lot of throw during practice. As soon as that green flag drops, you have adrenalin pumping and precision flying goes out the window. It's far too easy to yank and bank in the heat of battle, therefore the less throw you have the better off you'll be. Minimal control throw is one of the hardest aspects for new pilots to grasp because sport models use a lot of throw and pilots are used to this feel. The most common reply to minimal control is, “I like a lot of throw in case I get into trouble.” I contend, with a lot of control throw you will get into trouble. With minimal throw, there's no need to get out of trouble because you never get there in the first place.
Along the lines of minimal control throw is elevator tuning. The elevator sets the radius of your turns. The full pull turn is a must to flying consistently. I tune the elevator for a full pull turn through pylon 2 and 3 and take what I get at pylon 1. This was a new technique for me after my long pylon hiatus but it really works. If you start a full pull turn at pylon 2, pylon 3 will be a no brainer, if and only if you nail pylon 2. So how do you know if you're close to Pylon 2? Get over close to it so you can easily judge your depth from the pole. If you stand up in the middle or further away from the pylon, it's much more challenging to judge your depth. Since this technique requires a close and consistent proximity to pylon 2, or you'll cut 3 every time, get within 20-30 feet of the pole to see what's going on.
Now that you've mastered the 2/3 turn it's time for that all important leg from pylon 3 to pylon 1. This leg is very critical because without a consistent distance traveled, you're caller will never be able to really dial you in on pylon 1. The objective here is to fly as straight and as consistent as possible to give your teammate the same look and place to start his cadence lap after lap. If you arc this leg differently each lap, the effective distance traveled changes and the cadence will be wrong leading to a cut. Fly straight, fly fast, give your caller a chance.
Ik ga ook zo aan de slag.
Hugo
Hoi Hugo,
mooi stukje !
Ik ga dat eens proberen, zo weinig hoogte uitslag dat je precies pylon 2 en 3
in een aaneengesloten bocht vliegt.
Is met de E2K schuurdeurtjes best een mooie optie. Die hoeken toch niet best.
De rolroeren bestaan straks uit 3 secties (per vleugel helft), met tape aan elkaar. Anders scharniert het natuurlijk nooit.
Dit is redelijk gebruikelijk bij oa. F5D FAI kisten.
Ik ga ze met 2 servo's aansturen en een beetje experimenteren met flapperons, dus als flaps gebruiken, gemixed met hoogte.
Tjarko
Zelf gekweekt? :>)...wat meer 220 grams UD gras...
Tjarko
Als die harf blijkt te gaan ...
Ja, anders gaat'ie niet harf. Dat snap je toch
")
Hugo
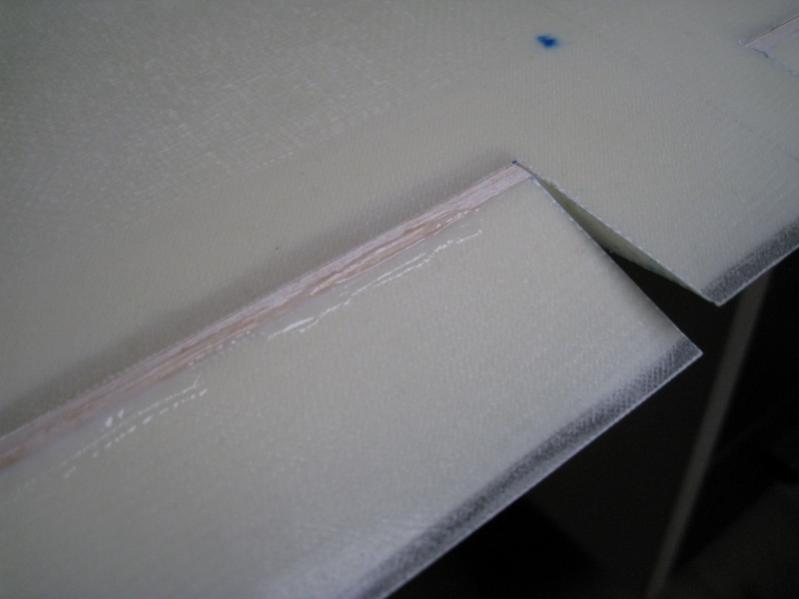
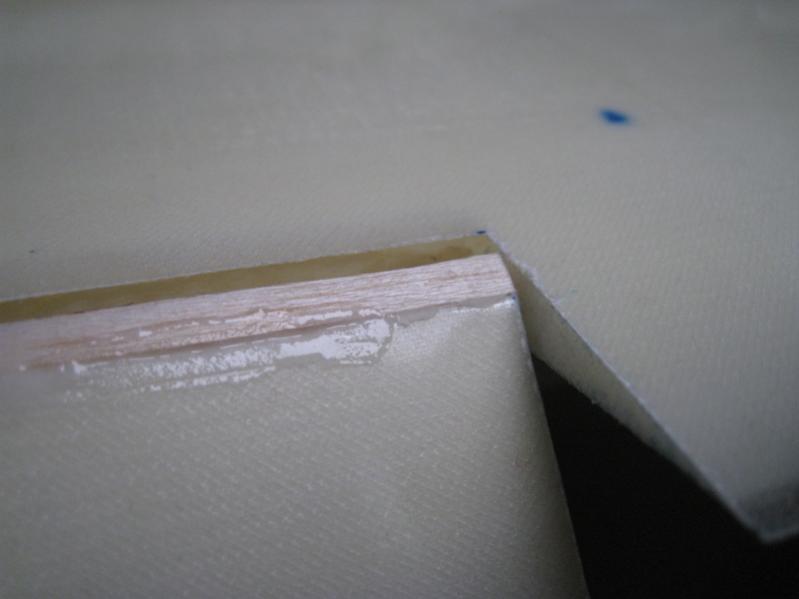
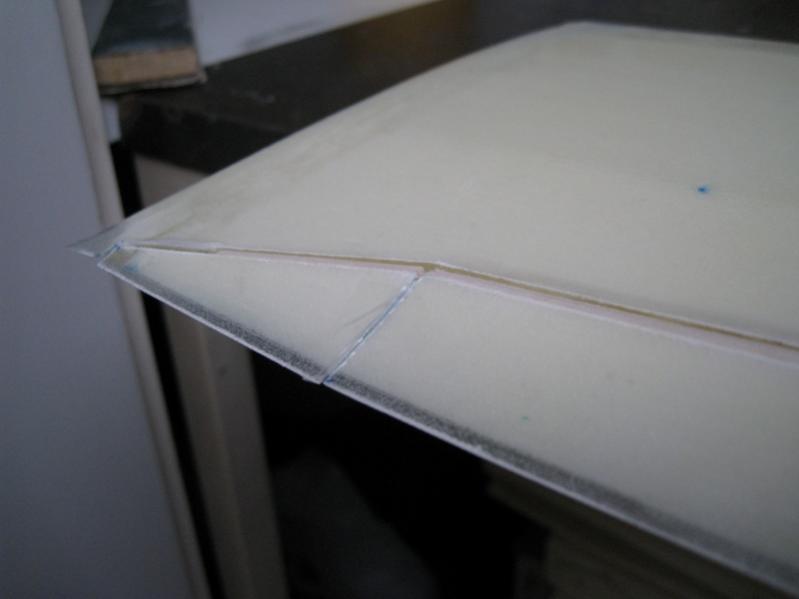
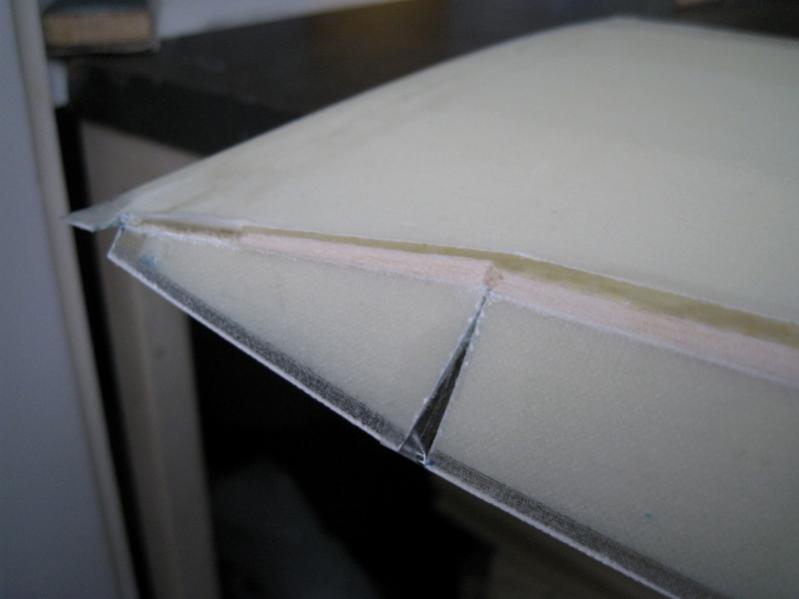
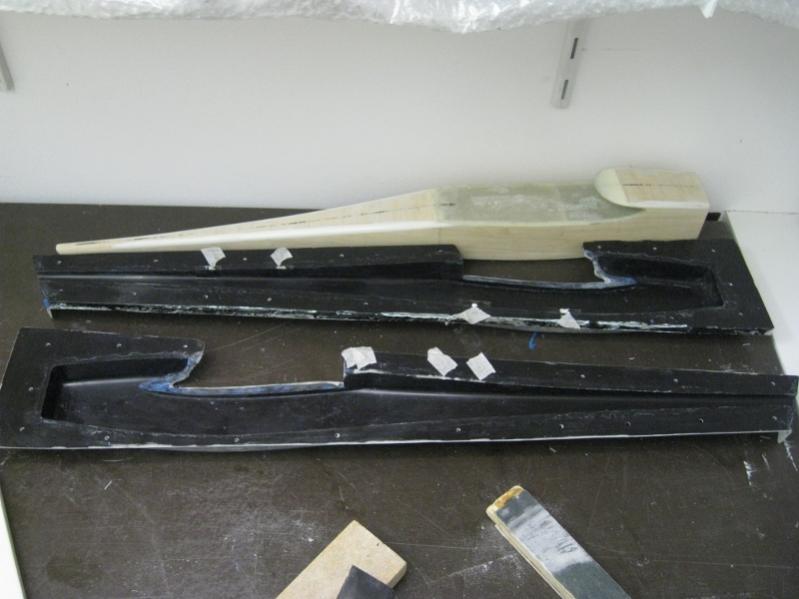
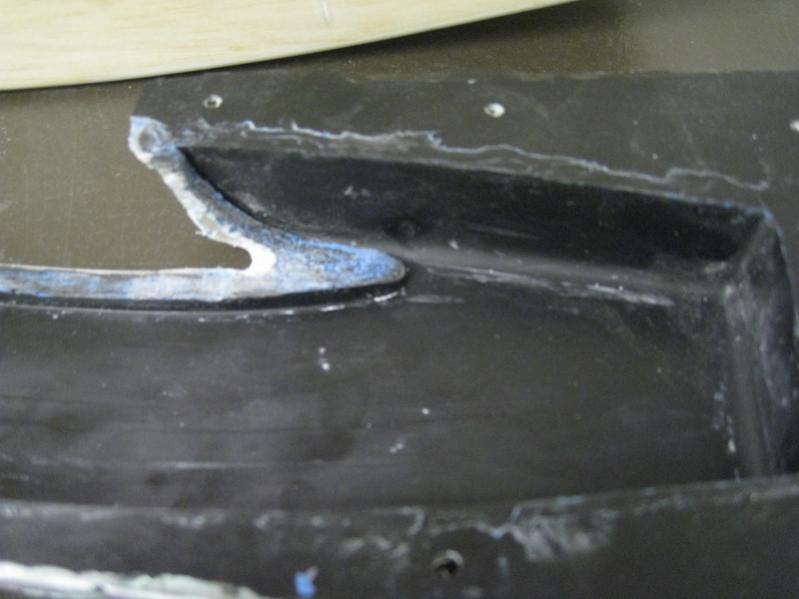
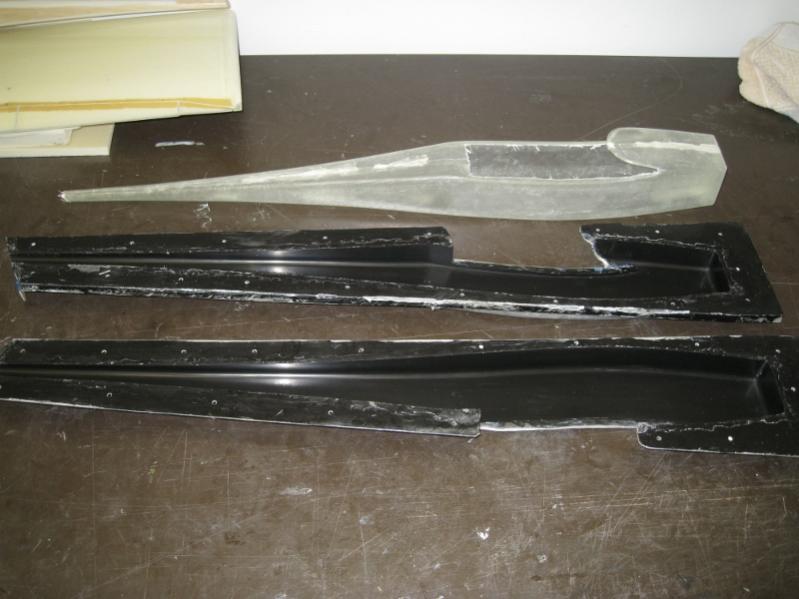
rolroeren
Zo de rolroeren alias flapperons zitten er ongeveer in.
De originele kier van 3 mm breed vond ik er niet uitzien dus wat geprobeerd met afdichtingen.
Eerste profje met epoxy micro ballons ging helemaal mis, dus nu met balsa
Misschien niet de handigste methode voor een spleetafdichting, maar het werkt.
En de romp plug zit voor 50% in de mal..

romp plug en bovenzijde vleugel met rolroeren.
details rolroeren..
Ik moest een gat dichtplamuren... van cyano, verkeerde soort..
Tjarko
Zo de rolroeren alias flapperons zitten er ongeveer in.
De originele kier van 3 mm breed vond ik er niet uitzien dus wat geprobeerd met afdichtingen.
Eerste profje met epoxy micro ballons ging helemaal mis, dus nu met balsa
Misschien niet de handigste methode voor een spleetafdichting, maar het werkt.
En de romp plug zit voor 50% in de mal..
romp plug en bovenzijde vleugel met rolroeren.
details rolroeren..
Ik moest een gat dichtplamuren... van cyano, verkeerde soort..
Tjarko
Laatst bewerkt door een moderator:
Hoi peet,
Inderdaad lekker zitten knutselen! Heerlijk.
Ik denk dat het ook heel simpel kan, gewoon met soldeerbouten een sleufje maken onder de huid en een tape-je op het rolroer. Dat kan Hugo mooi proberen. Die dingen bedenk je natuurlijk net 1 dag te laat.
Ik heb met de soldeerbout heel wat materiaal weggesmolten om de afdichtlippen kwijt te raken.
Het uiteinde van het rolroer loopt taps uit. Gejat idee, oa van avionics, de oudere versies hadden dat ook. Mijn rolroeren bestaan uit 3 secties. Het idee is dat ze een elliptische liftverdeling geven als ze als flapperon gebruikt worden.
Dan kom ik hopelijk met net wat meer snelheid uit de bocht
Er zit nog een piepklein randje plamuur dat ik moet wegschuren, bedoelde je dat?
Tjarko
rompmallen gelost
Zo dit is mijn eerste romp mal.
Redelijk gelukt. Enkel een paar kleine luchtbelletjes en een klein stukje positief dat in een mal bleef zitten. Wordt nu gerepareerd.
Ik ben benieuwd of ik er nette rompjes uit kan halen. De inkeping voor de vleugel is heel diep, zodat er geen los stroomlijn stukje boven op de vleugel meer nodig is. Maar dat is wel wat tricky lamineren denk ik.
Tjarko
Laatst bewerkt door een moderator:
Ik wil de tekening van mijn kist nog eens laten plotten, voor een tweede rompje (reserve). Als er interesse is kan ik er meerdere laten printen, inclusief verzenden binnen Nederland € 5,- per stuk. Dan krijg je de parts tekening gevouwen op A1, en de handleiding in kleur op A4. Ik zal nog even een Nederlandse vertaling maken van de handleiding.
Laat maar even weten per PM, ik wil over een paar dagen gaan bestellen.
Hugo
Laat maar even weten per PM, ik wil over een paar dagen gaan bestellen.
Hugo
Hallo allemaal,
er is wat interesse voor de tekening, leuk! Ik houd de lijst open tot en met aanstaande dinsdag. Dan heb ik genoeg tijd om het te laten printen en zaterdag mee te nemen naar de vergadering als ik daar tijd voor heb. Als je daar niet komt, of als ik niet ga, verstuur ik uiteraard per post.
Hugo
er is wat interesse voor de tekening, leuk! Ik houd de lijst open tot en met aanstaande dinsdag. Dan heb ik genoeg tijd om het te laten printen en zaterdag mee te nemen naar de vergadering als ik daar tijd voor heb. Als je daar niet komt, of als ik niet ga, verstuur ik uiteraard per post.
Hugo
tjarko's rompje
Zo tijdens wat familie bezoek kon mijn rompje helemaal uitharden.
Gelukkig kwam hij goed uit de mal.
Het was mijn eerste, met ruimschoots luchtbellen op de naad, maar niets wat met een beetje epoxy en microballons gefixed kon worden.
Het laminaal met 58 grams weefsel, wat UD en rovings en dan 160 grams weefsel is wel OK. Rompje is 78 gram.
Nu nog even afmaken.
Het volgende rompje krijgt waarschijnlijk een kleurtje d.m.v. een eerste laagje ingekleurde epoxy. Ik mag in huis vanwege allergieen niets gebruiken dat erg sterk ruikt, dus EP gelcoat durfde ik niet eens open te maken.
Weet iemand een andere reukloze kleur laag?
Tjarko
Laatst bewerkt door een moderator:
Helaas, bij deze zal ik je kist moeten afkeuren; veel te mooi. Nou lijkt mijne weer een lelijk doosje...
Ik weet dat je met food dye, kleurstof voor voedsel, vanalles kan kleuren. Ook CA lijm, bijvoorbeeld. Misschien het proberen waar, en zeker niet allergie opwekkend. Verkrijgbaar bij de betere (online) taartenbakspullenwinkels, deze even voor je gegoogled:
Kleurstoffen *-*Thee en Taartspulletjes
Maar er zijn er nog veel meer. Misschien een goede kookwinkel bij jou in de buurt.
[EDIT]Ook gevonden:
http://www.harjonpolyester.nl/index.php?pgname=KLEURSTOFFEN&cat_id=188
[/EDIT]
Hugo
Laatst bewerkt:
Bouwaanwijzing:
https://dl.dropboxusercontent.com/u/81093150/Slick E2K build guide.pdf
Tekening van de romponderdelen:
https://dl.dropboxusercontent.com/u/81093150/Slick E2K fuse parts drawing.pdf
Succes aan iedereen die er ook aan begint, feedback wordt altijd gewaardeerd.
Hugo
Ik kan bovenstaande post niet meer wijzigen, daarom even gequote.
Inmiddels is er ook een Nederlandse handleiding beschikbaar:
https://dl.dropboxusercontent.com/u/81093150/Slick E2K bouw handleiding.pdf
Daarnaast heb ik de staartroeren van de V staart op tekening verdiept van 15 naar 25mm. De kleine roeren doen het op race snelheid goed, maar op landingssnelheid zijn ze wat klein. Dan moet je de uitslag erg groot maken, waardoor ze meer gaan remmen dan sturen.
Hugo
Even een vraag? Ik ben bezig met het bouwen van een e2k. Zou het mogenlijk zijn om mijn regelaar ( met koelribben aan de bovenzijde) in te bouwen aan de bovenzijde van dew romp. De koelribben zijn ook 3 mm en komen dan gelijk met de bovenzijde op deze wijze. Hierdoor wordt de koeling van regelaar groter.