Install the app
How to install the app on iOS
Follow along with the video below to see how to install our site as a web app on your home screen.
Nota: This feature may not be available in some browsers.
Je gebruikt een verouderde webbrowser. Het kan mogelijk deze of andere websites niet correct weergeven.
Het is raadzaam om je webbrowser te upgraden of een alternatieve webbrowser te gebruiken.
Het is raadzaam om je webbrowser te upgraden of een alternatieve webbrowser te gebruiken.
KOLDERSTOK BATAVIA / HAARLEM
- Topicstarter Heinrich
- Startdatum
@Hans Groenenberg: Baie dankie, Hans! Jou woorde van bemoediging is altyd welkom.
Vriendelijk groet - Heinrich
Vriendelijk groet - Heinrich
Hello everyone
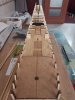
Time to move on to the next step. I had to decide whether to start with the afschuinsing and rompbeplanking or do the deck planking first. I know that planking the hull first, keeps the deck free from glue-smeared fingers, but despite that, I chose to start with the deck planking. Whether it was wise or not, I have no idea, but I do know one thing ... planking the deck second would have been a LOT more difficult with the hull planking in place. As it was, it seemed if I had barely enough room ...
The first step in the planking process is easy. Construct a grating box with 3 crossbeams using the 1.5mm x 1.5mm walnut strips. The sides were mitred at 45 degrees, put in place and glued.

Next up is the two schaarstokke on either side of the grating and then the fun began:
The planking between the two Schaarstokke is done with 3mm x 0.7mm Abachi planks that need to be planked in two layers. So I completed the first level between the gratings and the two sections on either side of it. An then I was puzzled ... Why did I have 11 planks between the sections on either side of the grating and only 8 in the grating. Because ... Heinrich had not used the 3mm planks, but the 4 mm ones.


SPOT THE MISTAKE!
Then I realised. This deck may look simple, but it is going to be require care. Luckily, I had only put down the first layer, so that could easily be repaired by the next layer, but the message was clear: PAY ATTENTION!

I took great care that the joints were properly lapped.
After 3 days of working on and off on the deck this is where we are now. The funny thing is that working so closely on the planking, you get tunnel vision and can't really form a good overall idea of the planking. Only after I had downloaded the pictures on the PC, could I get a proper idea of what it looked like.

I like how the Abachi takes on a "yellowish / orangy" colour in bright daylight ...

Which then becomes much darker in the fading light.

This then is where I am now. Of course, the finishing off still needs to be done, but for the time being, I think I will move on to the next step.
Thank you all for your interest and for following.
Kind regards - Heinrich
Time to move on to the next step. I had to decide whether to start with the afschuinsing and rompbeplanking or do the deck planking first. I know that planking the hull first, keeps the deck free from glue-smeared fingers, but despite that, I chose to start with the deck planking. Whether it was wise or not, I have no idea, but I do know one thing ... planking the deck second would have been a LOT more difficult with the hull planking in place. As it was, it seemed if I had barely enough room ...
The first step in the planking process is easy. Construct a grating box with 3 crossbeams using the 1.5mm x 1.5mm walnut strips. The sides were mitred at 45 degrees, put in place and glued.
Next up is the two schaarstokke on either side of the grating and then the fun began:
The planking between the two Schaarstokke is done with 3mm x 0.7mm Abachi planks that need to be planked in two layers. So I completed the first level between the gratings and the two sections on either side of it. An then I was puzzled ... Why did I have 11 planks between the sections on either side of the grating and only 8 in the grating. Because ... Heinrich had not used the 3mm planks, but the 4 mm ones.
SPOT THE MISTAKE!
Then I realised. This deck may look simple, but it is going to be require care. Luckily, I had only put down the first layer, so that could easily be repaired by the next layer, but the message was clear: PAY ATTENTION!
I took great care that the joints were properly lapped.
After 3 days of working on and off on the deck this is where we are now. The funny thing is that working so closely on the planking, you get tunnel vision and can't really form a good overall idea of the planking. Only after I had downloaded the pictures on the PC, could I get a proper idea of what it looked like.
I like how the Abachi takes on a "yellowish / orangy" colour in bright daylight ...
Which then becomes much darker in the fading light.
This then is where I am now. Of course, the finishing off still needs to be done, but for the time being, I think I will move on to the next step.
Thank you all for your interest and for following.
Kind regards - Heinrich
Danny Mulders
verslagschrijvers
Actually, the wider planks in the grating are pretty realistic. The gratings were covered with removable planks to allow sailors to walk on the gratings without twisting their ankles. These planks can easily be wider or narrower than the deck planks, so to actually have them be a different width from the deck planks accentuates the fact that they are loose items.
")
Jaques
Forum veteraan
[QUOTE = "Heinrich, post: 4026853, deksel: 68143"] Heinrich niet de 3 mm planken had gebruikt, maar de 4 mm planken.
[/ CITAAT]
Tja het blijft opletten Heinrich") Maar wat ik altijd doe bij het begin is om de doos op de eetkamer tafel uit te stallen en dan al het uitgevoerde hout uit te zoeken en te sorteren, dit is heel wat werk maar dat verdien je later geheel terug. ....
Maar wat ik altijd doe bij het begin is om de doos op de eetkamer tafel uit te stallen en dan al het uitgevoerde hout uit te zoeken en te sorteren, dit is heel wat werk maar dat verdien je later geheel terug. ....
Er is een troost, van deze roosters en gedeelte dek zie je later niets meer terug, tenminste op de Batavia: p
En dan nog blijft het opletten.
[QUOTE = "Heinrich, post: 4026853, lid: 68143"] Ik vind het mooi hoe de Abachi bij fel daglicht een "geelachtige / oranjeachtige" kleur krijgt ... [/ QUOTE]
Kopt is ook mooi, ik heb het ook alleen maar met glitsa behandeld, blijft het lekker licht.
Hiervoor heb ik de Bounty van Amati gebouwd waar donkere dekplanken bij zaten, en ja je raad het al, das helemaal niks, vind ik zeker.
Maar ga zo lekker verder, het ziet er geweldig uit, knap hoor: duimen omhoog :: duimen omhoog:
Tja het blijft opletten Heinrich
Maar wat ik altijd doe bij het begin is om de doos op de eetkamer tafel uit te stallen en dan al het uitgevoerde hout uit te zoeken en te sorteren, dit is heel wat werk maar dat verdien je later geheel terug. ....Er is een troost, van deze roosters en gedeelte dek zie je later niets meer terug, tenminste op de Batavia: p
En dan nog blijft het opletten.
[QUOTE = "Heinrich, post: 4026853, lid: 68143"] Ik vind het mooi hoe de Abachi bij fel daglicht een "geelachtige / oranjeachtige" kleur krijgt ... [/ QUOTE]
Kopt is ook mooi, ik heb het ook alleen maar met glitsa behandeld, blijft het lekker licht.
Hiervoor heb ik de Bounty van Amati gebouwd waar donkere dekplanken bij zaten, en ja je raad het al, das helemaal niks, vind ik zeker.
Maar ga zo lekker verder, het ziet er geweldig uit, knap hoor: duimen omhoog :: duimen omhoog:
TestWat raar, als ik hier in dit verslag een "QUOTE" plaats komt deze er geheel anders dan gebruikelijk uit te zien......
Ligt dit aan mij of hebben anderen hier ook last van????
Dit gaat goed...
Jaques
Forum veteraan
TestTest
Dit gaat goed...
Dit ook.... wat raar, met de i-pad wel maar op de pc niet.....
Ga ik morgen eens verder over puzzelen
@Danny Mulders : Interesting, Danny. Maybe I will alternate the sections in the grid then. I will see today, but many thanks for the input!
Kind regards-Heinrich
Kind regards-Heinrich
Beste Modelbouw vriende
Time for a small update.
I am slowly working towards the planking of the hull, but first there are a few loose ends that need attention. First was the wulf that needed to planked. Some of you choose to do the planking on the ship, but I was not that brave. I dry-fitted it to the hull, and then traced two lines on either side of the keel with a pencil. This area would represent my “keep clear” zone - otherwise the wulf would not go over the keel.

With the help of a protractor the correct angle was determined and the first few planks laid down. You will notice that the thickness of some of the planks vary slightly (not much, but noticeable) which I really like in this case. They can obviously be smoothed out during the final sanding and finishing, but for now they create great definition between the planks. Also, I did not try to select strips that were the same in appearance to one another - I picked them randomly. As the Admiraal has already noted, the Dutch ships were built with whatever was at hand and sometimes it led to a far less structured approach than ... say ... the British.
Once I got planking, I completely forgot to take photographs. So, unfortunately, I have no pics of the wulf in its "ystervark" state. With the planking finished and the glue properly dried, I turned the wulf on its other side, clamped it to a cutting board and traced repeatedly with a box cutter around the outer edges. This went surprisingly easy.

Piet will notice the piece that still has to be glued in here.

And dry-fitted to the schip.
Then it was time for cutting open the gunports and trying to see if there is a way of installing cannon boxes in the very limited space available behind the wulf. But then I realised ... there was no way that my box cutter / multi-purpose knife was going to fit into the gunports. Neither do I possess a chisel with a 5mm (or smaller) cutting face. A visit to the hardware store was also unsuccessful, so I ordered an Xacto knife from Taobao and will now just have to wait until it gets delivered.
.jpg")
Nou hoekom die foto upside down is, sal net hy weet. Maar al staan ek op my kop gaan die mes nie daar inpas nie!
When I viewed Danny Mulders's build log of the Batavia, the opening behind Spant #12 was sealed off with a black-painted “wand” which gave a nice and finished-off look to the deck area below the quarterdeck. I checked but did not have such a wand in my bouwdoos. Hans told me that because this area is not really visible, this piece has been omitted from later kits. Granted, I agree it is not very visible, but I liked it.

Die gat in rooi gemerk, moes toe.
I delved into my box of scrap wood and came up with a “beam” which I cut to length, bent into the curvature of the deck, painted black and glued up against the rear of spant #12. A scrap piece of MDF was then shaped to follow the beam’s curve, painted black and glued on top of the beam and against spant #12. Now with the black wand, the unfinished area is no longer visible from the front and there is a definitive and clear line from where the planking starts.


Still keeping the planking in mind, the bow section is filled with balsa blocks which are then shaped into the correct form to assist when planking. Below the false deck this is easy, but above the false deck the balsa blocks do three things: 1. They also assist with the shape of the bow; 2. They form the floor on which the planking in front of the luizenplecht is done and 3. they provide the correct height for the front wand of the luizenplecht.

I thought it was a good idea to install the bakdek at this stage as I think it will help making the shaping of the balsa blocks at the luizenplecht easier.
Time for a small update.
I am slowly working towards the planking of the hull, but first there are a few loose ends that need attention. First was the wulf that needed to planked. Some of you choose to do the planking on the ship, but I was not that brave. I dry-fitted it to the hull, and then traced two lines on either side of the keel with a pencil. This area would represent my “keep clear” zone - otherwise the wulf would not go over the keel.
With the help of a protractor the correct angle was determined and the first few planks laid down. You will notice that the thickness of some of the planks vary slightly (not much, but noticeable) which I really like in this case. They can obviously be smoothed out during the final sanding and finishing, but for now they create great definition between the planks. Also, I did not try to select strips that were the same in appearance to one another - I picked them randomly. As the Admiraal has already noted, the Dutch ships were built with whatever was at hand and sometimes it led to a far less structured approach than ... say ... the British.
Once I got planking, I completely forgot to take photographs. So, unfortunately, I have no pics of the wulf in its "ystervark" state. With the planking finished and the glue properly dried, I turned the wulf on its other side, clamped it to a cutting board and traced repeatedly with a box cutter around the outer edges. This went surprisingly easy.
Piet will notice the piece that still has to be glued in here.
And dry-fitted to the schip.
Then it was time for cutting open the gunports and trying to see if there is a way of installing cannon boxes in the very limited space available behind the wulf. But then I realised ... there was no way that my box cutter / multi-purpose knife was going to fit into the gunports. Neither do I possess a chisel with a 5mm (or smaller) cutting face. A visit to the hardware store was also unsuccessful, so I ordered an Xacto knife from Taobao and will now just have to wait until it gets delivered.
Nou hoekom die foto upside down is, sal net hy weet. Maar al staan ek op my kop gaan die mes nie daar inpas nie!
When I viewed Danny Mulders's build log of the Batavia, the opening behind Spant #12 was sealed off with a black-painted “wand” which gave a nice and finished-off look to the deck area below the quarterdeck. I checked but did not have such a wand in my bouwdoos. Hans told me that because this area is not really visible, this piece has been omitted from later kits. Granted, I agree it is not very visible, but I liked it.
Die gat in rooi gemerk, moes toe.
I delved into my box of scrap wood and came up with a “beam” which I cut to length, bent into the curvature of the deck, painted black and glued up against the rear of spant #12. A scrap piece of MDF was then shaped to follow the beam’s curve, painted black and glued on top of the beam and against spant #12. Now with the black wand, the unfinished area is no longer visible from the front and there is a definitive and clear line from where the planking starts.
Still keeping the planking in mind, the bow section is filled with balsa blocks which are then shaped into the correct form to assist when planking. Below the false deck this is easy, but above the false deck the balsa blocks do three things: 1. They also assist with the shape of the bow; 2. They form the floor on which the planking in front of the luizenplecht is done and 3. they provide the correct height for the front wand of the luizenplecht.
I thought it was a good idea to install the bakdek at this stage as I think it will help making the shaping of the balsa blocks at the luizenplecht easier.
Bijlagen
Bakdek sit.
En om seker te maak daar is mooi eweredige spanning op die spanten het ek oof die stuurplecht dek geplaas. Eintlik moes dit die halfdek gewees het, maar daar is nog te veel afwerking wat op die hoofdek gedoen moet word.
En laastens net seker gemaak alles is waterpas.
Baie dankie vir die lees en volg.
Vriendelijk groet - Heinrich

Beste vriende
Hier is so baie kennis en ervaring op die forum - ek wil graag raad vra? Watter afwerking/finish bevel julle vir die Abachi dek aan?
Hans het reeds aan my die staalwol/asyn genoem, maar ek wil nie n verwerings/verouderingseffek he nie. My enigste voorkeure is dat ek hou van die ligte kleur van die Abachi (ek glo dit is n mooi kontras met die donker hout van die romp) en dat ek nie iets wil gebruik wat n "glossy" of "shiny" is nie.
By voorbaat dank. Vriendelijk groet - Heinrich
Heinrich ik lees hier veel goede ervaringen met Danish Oil.
Geeft mat effect.
groet Cor
Geeft mat effect.
groet Cor