Dat had ik je zo kunnen vertellen...
")
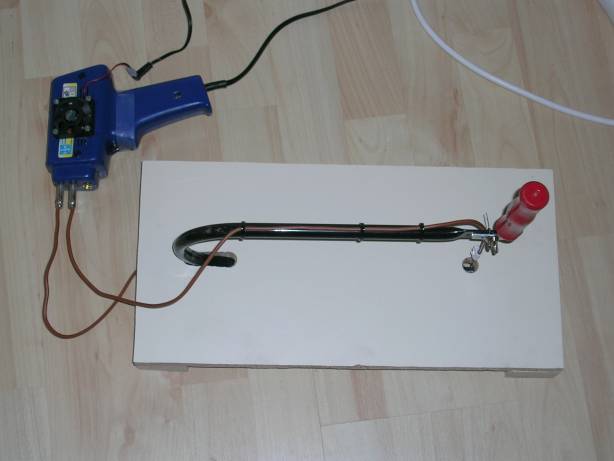
Mijn ijzerdraad is zo'n 5cm lang. Dit wordt net heet genoeg om depron te smelten.
Voor 50cm snijdraad heb je een veel hogere spanning nodig.
Ik vond de volgende samenvatting op het briljante af:
http://www.rcgroups.com/forums/showthread.php?t=628704
--------------------------------------------------------------------------------------------------------------------------------------
Summary of hot wire & power supply issues
________________________________________
Here's my summary of points that I've gathered about hot wire power supplies & wires, largely from the "Train Transformer Questions" thread here:
http://www.rcgroups.com/forums/show...772#post6002347
1. A lot of people run transformers over their rated amperages, and some of them burn out. There's a lot of bad info out there about using doorbell transformers or train transformers and random steel wires, etc.
2. For typical "easy" cutting, like wings from not-dense-or-strange foam, you want about 2 to 5 amp capacity, depending on wire diameter and bow length. (More on that below.)
Assuming you use stainless steel wire, you will probably need about half a volt per inch of wire, so a 12-volt power supply can drive a wire up to about two feet long, and a 24-volt power supply can drive one up to about four feet long. For thin wires, such as .012, you need fewer amps (almost 2) but also get somewhat less length at a given voltage. For thick ones like .024, you need more amps (around 5) but somewhat fewer volts per inch, so you can power a somewhat longer wire.
(Doubling the wire diameter from .012 to .024 doubles the power (watts) that you need, because you must melt twice as wide a swath of foam. It decreases the wire's resistance per inch by a factor of four, though, because the resistance is proportional to the cross-sectional area of the wire. To generate 2x the heat with 2x the wire diameter turns out to require about 2/3 the volts per inch but almost 3x the amps.)
These are very rough ballpark numbers based on some crude experiments and anecdotal evidence from several people's setups. Your mileage WILL vary, based on a number of factors:
AC power in the US can be anywhere from 110 to 120 volts, and since the wattage is proportional to the square of the voltage, the heat you get at 110 volts is about 15 percent lower than the heat you get at 120 volts. (Given the same step-down transformer, wire, etc.)
Different alloys of stainless steel may have somewhat different resistances.
Different transformers' output voltages may vary from their nominal voltages under heavy loads by different amounts.
Different voltage-cutting devices (dimmers, router speed controls, etc.) may have different small losses on the top end of the voltage range.
People have varying expectations of cutting speed. (Usually about a quarter of an inch per second, but varying by a factor of two either way.)
3. Either AC or DC will work to drive a hot wire. Rectifying AC to DC and smoothing it out with a capacitor gives you up to 42 percent more volts and let you use a somewhat longer wire.
3a. To rectify the current, plug the output of your transformer into the AC inputs of a bridge rectifier, and use the + and - outputs of the rectifier.
This will give you a "pulsating DC" output, where the forward half of the AC cycle goes through unmodified, but the backward half goes through reversed, i.e., forward. The result is 120 forward half-sine-waves per second.
You'll need a bridge rectifier rated at at least 1.42 times the output voltage of your transformer, and 1.42 times the amps. (They're rated in DC terms, and must handle the peak voltage of the transformer's AC output, not just the average.)
Just rectifying the current won't let you use a longer wire. (A resistance wire doesn't care which way the pulses of current are going through it.) To get the voltage boost, you need capacitors to store & release charge during the AC cycle:
3b. To smooth the output and raise the average voltage, just connect electrolytic capacitor(s) across the output wires, being sure to connect the positive end of the capacitor(s) to the positive wire and the negative to the negative.
(The capacitors will absorb charge from the wires when the voltage is higher than the charge they're holding, and release it back when the wire's voltage is lower.)
To get most of the theoretical voltage boost you need a few thousand microfarads of capacitance. Use electrolytic capacitors rated at least 1.42x the AC output voltage rating. The higher your amp draw, the more capacitance you need to smooth the waveform.
You can connect multiple capacitors in parallel (i.e., all the same way) and their capacitance will add up. (For example, two 2200 uF capacitors are the same as one 4400 uF capacitor.) The capacitors should have a voltage rating of at least 1.42x the transformer's AC output voltage rating.
4. For a given kind of wire (material and diameter) you need a certain number of amps, independent of the length of the wire. For different lengths, you need fewer or more volts to get that amperage.
Three basic things to know:
4b. For a given kind and diameter of wire you need a certain number of amps to raise it to a certain temperature for cutting, generating a certain number of watts per inch (say 1 or 2). To keep it hot while cutting, you need watts proportional to its length times its diameter, because you must melt that big a swath through the foam. This is usually about a watt per inch for .012 wire, 1.5 watts per inch for .018, or 2 watts for .024.
4c. The voltage you need is directly proportional to the length of wire you want to heat, e.g., to heat twice as long a wire you need twice the volts (but the same amps), BUT
4d. for a fixed-length wire, the power and heat are not directly proportional to the voltage---they are proportional to the square of the voltage. So for example, if 6 volts leaves the wire a little too cool, switching to 12 will make it way too hot; going from 6 to 12 doesn't double the power, it quadruples it. (Not quite, really, because a wire's resistance increases slightly with temperature. But still, doubling the voltage is a very big jump in power. In general, trying to adjust the heat by switching between a few fixed voltages will fry your wire.)
In short,
FOR A LONGER WIRE, YOU NEED MORE VOLTS, and
FOR A THICKER WIRE, YOU DRAW MORE AMPS
5. With two amps max, you need to use fairly small-gauge, high-resistance wire for it to heat up at two amps or less. If the wire is regular or nickel steel, such as a regular guitar string, it needs to be very small gauge.
Current handling (amps) is generally the limiting factor for the suitability of a transformer.
For a fairly thin resistance wire, such as .012" diameter stainless steel, you want a watt or so of heat per inch of wire, and you need an amp or two to get that. You can get by with a bit less if you use very fine wire which has more resistance. (Such as 26 gauge nichrome.)
For a long bow, more than about three feet long, you will likely want to use a somewhat thicker wire, such as .016" or .020" stainless steel, which will require somewhat more watts and substantially more amps to get those watts, roughly three or four amps. For a very long bow (say, 6 or 8 feet) you may want even thicker wire, and an ampier power supply, such as 5 amps for an .024" wire.
(For a longer bow, you generally want a stronger wire, so that you can keep it taut against greater drag when pulling it through the foam, without it breaking too often. A larger diameter wire will do that, but actually increases the drag a bit---doubling the wire diameter doubles the drag, which is proportional to the width of the cut, but quadruples the wire strength, which is proportional to the cross-sectional area of the wire, for a net increase of a factor of two in strength vs. strain.)
Some people use thicker wire for shorter bows than the above guidelines suggest. (E.g., .020" on either a long or short bow.) This is fine if your power supply can handle the amps.
6. A lot of people prefer inexpensive stainless steel wire to nichrome, because it's physically stronger; you can pull it tighter to ensure that the wire stays straight when cutting foam. (It also has slightly lower resistance than nichrome, which can allow you to use a slightly longer wire with a given voltage of transformer, while still being resistive enough to work with moderate amps.)
7. If you do want thin nichrome, you can get it from
www.aeroconsystems.com. ($9 per 30-foot coil, 26 gauge, 2.67 ohms/foot cold, probably about 3 at working temperature.) You can get thicker nichrome from
www.infraredheaters.com.
8. A lot of people use stainless anywhere from .011 to .024" in diameter, or even a bit larger for very long bows (over about 5 feet). Be careful about the diameter if you're using a marginal power supply---the thicker your wire, the more amps it will draw at working temperature. (Likewise, if you use plain steel, it will need a lot more amps because its resistance is several times lower.)
Stainless steel guitar strings will work, but it's hard to find single stainless strings these days, and buying a sets of six mostly-too-big strings and only use one or two is not as economical as just buying stainless wire from Cabela's or Small Parts, Inc.
www.musiciansfriend.com sells sets of 6 stainless (Fender or Ernie Ball) guitar strings for about $3.50. (Besides, guitar strings are only about three feet long; if you want a bow more than about 32", you want to find longer wire.)
Your local bait and tackle shop or sporting goods store may have appropriate stainless-steel leader wire, in 30-foot lengths for under two dollars. (Unfortunately, my local sporting goods stores didn't have it when I first looked---it appears to be a seasonal item there---but I finally found a bait shop that did.) Look for stainless leader in the 25- to 140-lb test range. (It may or many not be marked with the actual wire diameter. 25-lb test is very thin, and .024 stainless tests at about 130 lbs.) Be sure it's stainless steel, not just plastic-coated, or the resistance may be way too low.) If it is both stainless and plastic-coated, you can just burn the plastic off by heating up the wire, and wipe off the residue. (Don't breathe the fumes.)
Small Parts, Inc. sells 30-foot lengths of 304 stainless steel wire, for two or three dollars each in the range of .011" to .020".
http://www.smallparts.com/products/descriptions/swx.cfm (Unfortunately, the base shipping is about 4 dollars, so for just one piece of wire, you'll pay more for shipping. I paid a little over $13 to get 30 feet each of .011",016", and .020".)
Cabela's (
www.cabelas.com) sells spools of stainless wire for around $9. (You get hundreds of feet of the stuff, so you can buy some and have lots to parcel out to other people.)
9. If your transformer is dumb, you can put it on a regular dimmer or a router speed control, or maybe a fan speed control, with the voltage-varying gadget between the wall outlet and the transformer. This is easy and seems to work better than varying the voltage on the low-voltage side. It doesn't stress the dimmer or speed control as much as you might think at first, because the amps on the wall current side are much lower than on the hot-wire side. For example, if you're running a 24 volt (factor of five) stepdown transformer to get 4 amps, the amps on the high side are a factor of five lower---less than one amp. (The watts are the same, minus small losses.)
10. If you use a router speed control and an ampy-enough wall wart type transformer, you can just plug the wall wart into the speed controller and have a no-frills variable power supply, with a plug, a fuse, a switch, a knob and a socket already put together for you.
Harbor Freight regularly puts a 15-amp router speed controller sale for $12.50 or thereabouts. (Bear in mind that HF advertises some things on their web site but not in the stores, and you may need to print out the web page and show it to the people at the store to get that price.) The part number is 43060. (Here's a link:
http://www.harborfreight.com/cpi/ct...temnumber=43060) (Note: HF seems to have sold at least 3 slightly different speed controllers under the same stock number, two of which are marked 0 to 10 and are continuously variable, and one which is misleadingly marked low/medium/high but is actually continuously variable too. They all seem to work fine for a hot wire.)
Altex (
www.altex.com) sells higher-amperage wall-wart type transformers than most places, at good prices. They include a 12V 40VA transformer (i.e., 3 1/3 amps), a 16V 40 VA (i.e., 2 2/3 amps), and a 24V 50 VA (i.e. a shade over 2 amps.)
10b. I if you have a variac-type autotransformer, you can use it in the same way as a router speed control. Unfortunately, variacs are expensive, so if you don't already have one, it will be cheaper to use a dimmer. (You should use the variac with another transformer for isolation; more on that below.)
11. If you don't have a variable power supply, you can sorta fake it by using about the right gauge of wire for the length you want, electrically connecting the wire using an alligator clip at at least one end, and adjusting the effective hot wire length by moving the alligator clip. You can do this without shortening your bow, by using a slightly thicker wire that's "too long" and takes a right angle turn through a screw eye that acts as a pulley. You fine-tune the length in that "extra" bit that you don't actually use for cutting. This works better than you might think, once you've got the right kind of wire for your voltage and bow length, because varying the effective wire length by ten percent varies the wattage by about twenty percent. (The wattage depends on the square of the voltage.)
12. Dumb car battery chargers make fine transformers if they have enough amps for you. Smart ones are problematic if you want to put them on a dimmer or speed control, rather than tweaking the wire diameter and length.
13. Doorbell transformers generally can't handle the amps.
14. Train transformers typically can't either, really. Modern ones will shut down on you, and old ones may burn out. Check the ratings and figure out what load you're putting on them.
15.
www.allelectronics.com has good prices on fairly ampy transformers.
16. When picking a transformer, make sure it handles the amps you need, not just the watts. Transformer capacities are often listed as VA (volts * amps) at their intended voltages. Dimming a transformer will not make it able to handle more amps.
So, for example, you may have a 24 volt, 50 VA transformer, which is a 50 watt transformer at 24 volts. And that's a bit over two amps at 24 volts. (volts x amps = watts). If you dim it down to 6 volts, you still shouldn't put more than about two amps through it, so you can only get about 12 watts out of it. If you try to get 50 VA out of it at 6 volts, you'll fry it.
Likewise, you might try to use a foreign voltage converter to crank your (AC) power supply's volts down further, and the amps up correspondingly. Be careful about that. First off, don't expect it to work if it isn't a real transformer, which is pretty big. The little lightweight high-amp foreign voltage converters are switching power supplies, not transformers. Second, if it is a real transformer, it's probably not able to handle the amps. A "500-watt" 120/240V transformer can only handle a bit over 4 amps. (4 amps x 120 volts = 480 watts.) If you run it at some lower voltage, like stepping 12 VAC down to 6 VAC, it still will only handle 4 amps or so, giving you a max of about 25 watts.
17. In a pinch, you can gang two transformers of the same make and model together in parallel to get twice the amp capacity. You need to make sure they're wired in the same polarity, but that's not hard with a multimeter. Usually it's simpler and about as cheap to get one transformer with the amps you want from All Electronics.
To check the polarity, first wire the primary high-voltage sides in parallel, then connect one end of the low voltage sides together. Then check the AC voltage between the other ends with a multimeter. If the polarity is right, you'll get something very close to zero, because the transformers are opposing each other. If it's wrong, you'll get 2x what each individual transformer puts out, because you've inadvertently wired them in series. In that case, switch one of them, using the other secondary wire, and then connect the other ends. Do this with the transformers dimmed about halfway, if you can, to avoid overvoltage on the secondary side if you got it wrong.
(This will work with wall warts as well; to "wire" the primaries in parallel, just plug them into the same multi-outlet extension cord or power strip, and plug that into your voltage-varying gadget. Wire the secondaries as described above, including the polarity test.)
Don't try to wire different-make-and-model transformers in parallel, even if they match in their basic volt and amp specs, unless you know more about impedance matching than I do. (The numbers of windings in the coils and the amount of iron in the core matter for this.)
17b. In a bigger pinch you can wire two transformers in series to get more voltage. (That is, you wire the primaries in parallel and the secondaries in series.) For this to work, though, the cases & cores must not be grounded, and you mustn't short across them, or you can build up a higher voltage than their insulation is rated for... so they should be mounted in an enclosure where nothing can short between the transformers' outsides. (The enclosure should be marked saying that the transformers inside are ungrounded---DO NOT TOUCH THEM with the power on.) This is probably only worth doing if you need to heat a longer wire than the commonly available 24-volt transformers can drive, and if you understand the issues in making a proper enclosure.
18. It's nice to have an ammeter in your setup, so that you can figure out the amps you want for the gauge of wire you're using, and just dial up to that with whatever length of wire you're using. That makes it easier to avoid blowing it, too.
All Electronics sells ammeters listed as Panel Meters, for $12, with the type of meter implicit in the rating. (E.g., a 15A DC panel meter is a DC ammeter that measures 0-15 amps.) Make sure you get AC if your output is AC, DC if it's DC.
EDIT 20 Jan 07:
17b. Harbor Freight sells a multimeter for $10 that goes up to 10 amps DC.
http://www.harborfreight.com/cpi/ct...temnumber=92020 It likely goes on sale regularly for substantially less. This won't work for AC output, but a $2 to $4 rectifier will give you (pulsating) DC, which may be better anyway.
(I'm guessing it will read some fraction high, if you don't smooth the current out with a capacitor, because cheap meters tend to read closer to peaks of pulsating DC, rather than the average current... but that may not be true anymore with digital meters... anybody know? Is there a standard conversion factor? A capacitor to smooth it out would also eliminate or reduce the error.)
EDIT Jan 21 07: Apparently the $10 yellow multimeter from Harbor Freight has a DC ohms range up to 10 amps, like the $10 red one, even though the catalog listing doesn't say so. Better, it's commonly marked down to a very few dollars ($2 to $4) in-store. That's the cheapest multi-amp ohmmeter I know of. It's the "7 function multi-tester," item number 90899-0VGA:
http://www.harborfreight.com/cpi/ct...temnumber=90899. (A rectifier & capacitor & multimeter would cost roughly the same as an AC amps panel meter from All Electronics.)
19. If you want to use a thick, shaped wire rather than a taut, thin one, you need a lot more amps. (Thick shaped wires and knife-like strips are useful for lathe-like cutting and other non-straight cutting, e.g. scaling up or down with a pantograph, or cutting solid (non-foam) plastic.)
20. You can make a high-amp power supply out of an ATX type computer power supply. (My 350-amp ATX supply is supposed to do 30 amps at 3.3 volts, and 16 at 12 volts, but I haven't figured out what I should really expect for this workload, and haven't stressed it yet.) EDIT Jan 20 07: you can get ATX power supplies for about $15 at places that sell salvage computer parts, like a Goodwill Computer Store. That's what I paid for mine, but they had some slightly lower-powered ones for $10. A few dollars worth of miscellaneous parts---resistors, wire, etc., and you're in business. There are several articles about how to do this on
www.instructables.com, including one where you only hack up an adapter, rather than the power supply or its cable, and it's very easy; since you don't open up the case, you don't have to worry about discharging the big capacitors in there to avoid getting zapped.
(For anybody who wants to do that, a few of my own points: (1) you may want to pay a few bucks for an ATX cable you can sacrifice, with all the right-colored wires already on it, rather than soldering wires to an ATX connector. I got one for $2 from a bin at the Goodwill Computer Store, and it made things really easy---you can just cut the wires the length you want, and mostly solder together the same-colored wires. (2) Don't believe the part about only needing 1 or a few of the same-colored wires; solder them all together if you're planning on running high amps. And (3) for the minimum load between 5V and ground, use two 5-watt power transistors in series, instead of one 10-watt one. Then you don't have to worry about heat sinking anything, because the same heat will be spread out over 2x as much resistor; they will get warm to the touch, but not hot. Fry's sells a 2-pack of 5 ohm 10 watt power resistors for $1, so this is cheap too.)
21. You can't put a switching power supply like a computer power supply or some regular wall adapters on a dimmer (or router speed control). If you're going to use a dimmer, you need a BDT. (Big Dumb Transformer.)
22. Apparently you can make a big fixed-voltage power supply into a variable-voltage supply with an LM 317 voltage regulator (which costs a very few dollars) and a power transistor. (I don't know how to do this, or what a suitable power transistor would cost.)
23. You can use a heavy-duty soldering iron for high-amp/low-volts bent wire stuff, making your own custom-shaped tips from 14 AWG copper, piano wire, or something similar. At this writing [jan 20 07], Radio Shack has pistol-style 100-watt soldering irons on clearance for $10.
EDIT Jan 22 07: I got one and measured the output voltage at about 0.5 volts, so if it really dissipates 100 watts, that's pushing about 200 amps through a short, thick wire. (0.5 volts * 200 amps = 100 watts) The wire's resistance is too small to accurately measure with my multimeter, but must be about 0.0025 ohms. To avoid stressing the transformer's current capacity, any other wire plugged in should probably have that much resistance or more.
24. It's good to have a fuse or circuit breaker on the bow side, e.g., a 4-amp circuit breaker for 4-amp output. You can get a little resettable circuit breaker for about the same cost as a fuse holder and a fuse. (E.g., a little fuse-holder-sized switch-resettable 4-amp circuit breaker for $4 from Fry's.)
25. It's apparently good to have a fuse or circuit breaker on the wall side, too, in case something bad happens between the transformer secondary and the wall. (I'm not sure how likely that is if the bow side is protected and you don't have exposed stuff that could short.)
To figure out what the wall-side circuit should be drawing, divide the max output of your transformer by the step-down factor---e.g., for a 24-volt, 4-amp transformer, you'll be drawing about (120 / 24) = 5 times fewer amps than you're putting out, and 4 amps / 5 = 0.8 amps, so a 1-amp fuse or breaker will be fine.
26. Don't use a car battery for this unless you really know what you're doing, amp-wise. The amps can make it do Bad Things, and sparks can make them worse. Use a charger, maybe, but an actual battery, no.
EDIT Jan 22 07: 26. Don't use a dimmer or variac and just use its output to heat a wire, without a transformer in between. The transformer provides isolation from the wall current and reduces shock hazards. It also gives you more control of the voltage on the low end, for shorter or thicker wires. (Most dimmers only go down to about ten percent of scale before shutting off entirely, and at least some variacs lose precision at the low end as well.)
[?? I guess that if you have a variac, which is just an adjustable but dumb transformer, you could use a "foreign voltage converter" transformer as a step-down transformer. (If you wire it backwards, and plug the variac into it.) That would only step the voltage down 2x, but it would give you isolation, and 60 volts is substantially less dangerous than 120, and it would help with the low-end precision problem. You wouldn't need a huge expensive stepdown transformer, because the amps on that end are not very high.) ??]
For more pointers to info on working with foam, see
http://www.rcgroups.com/forums/show...27&postcount=32
Some possibly useful data:
I measured the resistances of some 304 Stainless Steel wire from Small Parts, Inc.:
.011" dia.: 3.7 ohms/ft
.016" dia.: 2 ohms/ft
.020" dia.: 1.33 ohms/ft
And some stainless steel "utility wire" from the hardware store:
.036" dia: 0.3 ohms/ft
I also got some American Fishing Wire brand "tooth proof" stainless steel (single strand) leader wire, for about $1.30 per 30-foot coil at a local bait & tackle shop.
The 38-lb test wire has a resistance of about 3.4 ohms/ft.
The 27-lb test wire has a resistance of about 4.5 ohms/ft.
And here are some resistances of plain (not stainless) guitar strings. (Namely Ernie Ball Custom Gauge, which is the most common thing in music stores.)
8 (.008") 2.0 ohms/ft
9 (.009") 1.40 ohms/ft
10 (.010") 1.17 ohms/ft
12 (.012") 0.83 ohms/ft
(These numbers are very approximate. I wouldn't trust my meter on low ohms to less than about 10 percent.)
Here's some resistances of straight Nichrome-60 wire, mostly from infraredheaters.com:
26 ga. (.01594") 2.67 ohms/ft (from Aerocon Systems.com)
24 ga. (.0200") 1.671 ohms/ft
22 ga. (.0253") 1.055 ohms/ft
21 ga. (.0285") .8310 ohms/ft
20 ga. (.0320") .6592 ohms/ft
19 ga. (.0359") .5208 ohms/ft
18 ga. (.0403") .4219 ohms/ft
17 ga. (.0453") .3333 ohms/ft
16 ga. (.0508") .2595 ohms/ft
Doubling the diameter decreases the resistance by about 4x.
I think stainless steel has about 20 percent less resistance than nichrome, so it should have about 80 percent of the diameter, to give the same resistance. I'm not sure about that, though, because its resistance may go up more when it heats up. (Nichrome's only goes up 10 or 20 percent across 1000 degrees of temperature.)
Paul
P.S. Thanks to everybody who's clarified this stuff for me, especially Brad (arx_n_sparx) and BobK (Skinner46)... and to everybody who will correct me, too.
 Misschien dat ik er nog een kleine fan van een oude videokaart opzet om de warmte af te voeren. De bestaande koelsleuven zijn echt minimaal, ivm de veiligheid (220v).


")

