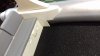
Good to here Dimitri, I always wanted a coloured windscreen, after many hours searching I found some , it reflects the light like a rainbow at different angles. Good that it's only 2mm thick, to bend it I bought a proper tool it looks like ladies electric hair straighteners, with these I could get the bends just right.


Install the app
How to install the app on iOS
Follow along with the video below to see how to install our site as a web app on your home screen.
Nota: This feature may not be available in some browsers.
Je gebruikt een verouderde webbrowser. Het kan mogelijk deze of andere websites niet correct weergeven.
Het is raadzaam om je webbrowser te upgraden of een alternatieve webbrowser te gebruiken.
Het is raadzaam om je webbrowser te upgraden of een alternatieve webbrowser te gebruiken.
Scratch built ribs and outboards
- Topicstarter Returntohome
- Startdatum


No problems at all with the sealant fit and forget. I did some weighing today , so this boat with outboard and 2 batteries will be 5kg which is 1 kg lighter than the other aluminium ribs. That should make it faster . It will be the go to boat for skiing.
Bijlagen

You are defeating sir Isaac Newton!
As long as the base is correctly bonded to your bed, this will be fine")
You start to appreciate the power of reusing 3D data!
Looks like a large part! PLA?
As long as the base is correctly bonded to your bed, this will be fine
You start to appreciate the power of reusing 3D data!
Looks like a large part! PLA?
It was way out, so complete redraw. This is going to be hard.
Something like a fillet might go to a "negative" value if you make the shell any thicker. In 99,99% of the cases it is often related to these kind of issues.
To cut out the mats the easiest way might be just to press the printed bow into the rubber to make an impression.